Sunday 21 December 2014

Downs and Ups

Downs -
Yesterday was a bit depressing. I got some feedback informing me that I had messed up big time.
A month or two a go I made some 3cm ish size textured and surface messed with disks as a way of showing my groovy textures. I then had a bright idea, they would make really nice buttons. So I drilled a couple of holes and put them on Etsy. Yay, Buttons! They got some likes and some kind soul bought some.


The trouble was, in my haste to get them out there, and with my concentration on what they looked like, I had overlooked an important thing about buttons and about the durability of polymer clay. Buttons have to be pretty strong, and a largish disk of polymer clay at about 2.5mm thick is not going to be strong enough to withstand the stresses that buttons need to withstand.
Sure enough, they broke and the buyer left a fully justified bad review. I of course apologised and offered a full refund including postage. I felt really stupid and guilty. . . Still do. So I have taken all the buttons I was selling off Etsy and will not offer any more for sale until I know that they are up to the task. I'm so annoyed at myself.

Ups -
This morning I sold a necklace! One of my image trans tube beads ones. Don't worry, unlike my buttons, my beads are solid! And the clasp on the necklace has been vigorously tug tested so that shouldn't embarrass me anytime soon. I sincerely hope!


And a local gallery sold two sets of my glass coasters. That cheered me up. I needed a bit of affirmation to counteract the button fiasco.
Well, onwards and upwards is what I say. .
Jon x

Wednesday 17 December 2014

An Experiment. . . .

Glass coasters from my Etsy shop

As you may or may not be aware, I have been making and selling framed tiles and glass coasters of my digital designs for a while now. To do this I use a process known as Dye Sublimation to transfer the
printed images onto the tiles or coasters. This involves using heat and pressure via a special heat press, specially coated tiles etc, and special printer paper and inks.

OK, Dye sublimation likes certain kinds of plastics and I was pretty sure that Polymer clay was likely to take a dye sub image pretty well. 
I decided to experiment as I had my specially set up printer and loads of paper, so I printed out a sheet of small images to mess around with. 
What I decided to do was use a disk of unbaked clay to apply the image to, but put a thin coating of liquid clay onto the image so that it stuck to the image and to the clay. The reason I wanted to stick the image to the clay was that I was intending to use a heat gun to 'bake' the liquid clay and transfer the image to it. If the image wasn't stuck down it would end up getting blown away. (I'm too impatient to bake them in the oven, and I wanted to do one at a time to see the results quicker)

So I tried that. I gave the image about one minute with the heat gun on medium. ( my heat gun has a heat intensity dial, which is very useful - Wickes sell that model ) I was careful not to burn it. The image became visible through the paper quite quickly but I kept heating it just to be sure it had transferred. 
I then wetted the back of the image and rubbed the paper off. You can soak it in a bowl of water if you wish, same difference. The clay disks weren't properly baked so I baked them in the oven for about 15 mins or so to cure the clay. The results were very clean and clear.

More or less un-messed with image transfer disks. Just a bot of Alcohol ink round the rim.
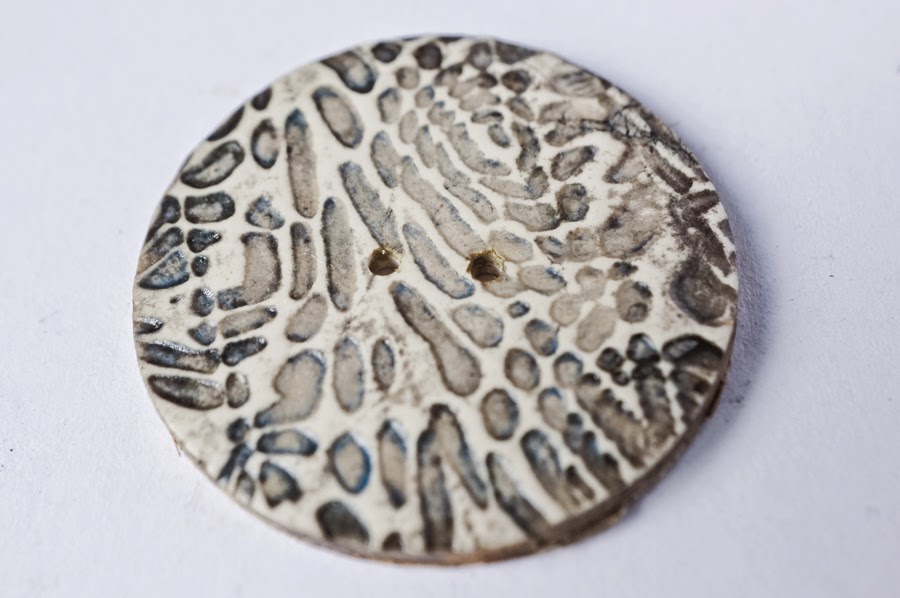
Too clean and clear for me ;-) having established that my method worked I decided to get stuck into some surface treatment on some of them. I tried my usual various combinations of alcohol inks, inca gold and gilder's wax in various colours, sanding it off a bit and then adding more, and so on and so on.
They looked nice, but there was no way of stringing them if I wanted to use them, so I made them into the front layer of some circular hollow beads, using the Claire Maunsell method with different sized cutters. This of course required the whole thing to be baked. . .
The trouble was that baking would melt the gilder's wax and disperse or otherwise mess up the alcohol inks intensity. Oh well, couldn't be helped. They came out solidly baked but a bit muzzy and fuzzy. So I used the same alcohol inks that I was painting the back and sides with to paint round the 'frame' of the front image. The resulting beads looked seriously beat up but cool all the same. Like something dug up from some archaeological site, on another planet. . . Which is fine by me.


But not as beat up as my attempts at transferring black and white images onto already baked clay disks. The image didn't stick to the clay as nicely as with raw clay and kept peeling off in an annoying way. I used some 'heat tape' that I use for dye sub stuff to hold it down but that wasn't always successful. I did the same as the beads above, giving them the surface treatment, then deciding to make them into usable beads by sticking another disk of clay behind them and then baking.


These ones look like they've been dug up from an ancient site, thrown off a cliff and then run over repeatedly by a chieftain tank. I like them though.

Next time I shall do things in the right order, but I shall still go for the messed up look ;-)
I might even do a proper tutorial in due course.
Jon x

Wednesday 10 December 2014

Waste not. . .

Even though polymer clay isn't ever so expensive I still don't like consigning potentially useful bits to the scrap . . . er. . . lump in my case. (What there is of it gets rolled into a multicoloured clump, like the way plasticene always ended up when I was a kid.)
So when I made these hollow beads I posted about before,


I used the squares cut out of the middle of their inner layers, to make these hollow beads,


Then the squares cut out of the middle of those beads' inner layers got made into these non hollow beads.


Only the little scrappy edge bits left over were fed to the 'lump'. . .

What I liked about this whole progression was that only the first part was planned, the rest was a spontaneous reaction to seeing the cut out bits in front of me.
I'm not trying to maintain that this was a major piece of lateral thinking or a unique insight, just the kind of enjoyable creative diversion we all make from time to time. Let's call it 'Play'. . .

I'm sure I read something recently about how useful play is in the creative process, (the Fall edition of Polymer Arts magazine I think) and I can only concur. The imagination and inventiveness involved in play make it a valuable and precious thing. For reasons I can't fathom those attributes are often underestimated and even dismissed, seemingly just because using them can involve fun, and of course anything fun is somehow not 'serious' and therefore not really the domain of adults/professionals/serious practitioners.
Yeah well, I'm happy to leave the serious work to the Grown Ups. I'll keep playing with stuff and see what I can come up with.
You can join in if you like ;-)
Jon x

Monday 8 December 2014

Cheap prints!


I extended my price realism still further - to my Tiles and Coasters shop. I have had abstract prints for sale on there for a fair few months now and though they have accumulated a fair number of faves and views, none have sold.


This is a shame, so, in the spirit of 'realism' referred to earlier, I have knocked the prices down by about 40%. This may result in nothing whatever changing, but at least I will know that it isn't the price that is putting people off buying.
Jon x


Sunday 7 December 2014

Destashing some old stuff and extending my price 'realism' ;-)


On having a look at the first listings I made on my Etsy shop, when I was nought but a green youngster. . . (Well, all right, four months ago. But I was green youngster in terms of selling beads and suchlike.) I realise that I have moved away, (I won't say 'on' as that is not for me to judge), from that stuff somewhat, and that as I don't feel quite so attached to those items I would be quite happy to see them go to a good home for a reduced price. Or possibly a more 'realistic' price, whatever that means.


I've also knocked the prices of some other items down a bit as I feel I would like to see them move on from their Etsy limbo. Plenty of likes, which is nice, but a few more sales would be cool. I'd like them to be out there in the big world, being used and worn and enjoyed ;-)
Not that reducing prices brings sales particularly, the psychology of perceived value being what it is, but it might be an incentive.
So check out my shop and see what you think.
Feel free to comment ;-)
cheers,
Jon x


Friday 5 December 2014

Black and White


It occurred to me while messing around with my Image transfer stuff, that a simple black and white image might look striking and graphic on a tube bead or two. While pondering this I remembered the images I have been using to make the negatives for my Photopolymer texture sheets, which were conveniently black and white and available. I got some examples printed off at the local copy shop and tried some out.


I thought they came out pretty well. The rounded pattern looked a bit like those African eye beads you see around, but nicely different. I tried some chunkier beads than my usual. I'll try some hollow ones at some point I think, that way they would be lighter.


I still have to work out how they should be presented on a pendant or necklace and what beads they might go with, but I'll mess around until something clicks.

cheers,
Jon x

Monday 1 December 2014

Image Transfer - more musings

Having been somewhat obsessed with rolling my image mapped bits of clay round tube beads, I decided to change focus for a bit and try using the flat images as just that, flat images. As the designs suggest tiles, and were initially created to echo tile designs in the real world I made what you might call tile beads with them.
I used a technique that Claire Maunsell shared a while back, for making hollow beads using cutters of different sizes, to construct a few square, hollow, double sided tile beads.


Basically, you transfer a couple of images using the water and index finger attrition method described in my previous post, making sure the image is slightly smaller than the larger of your two cutters.Then you cut out a couple of blank squares the same thickness as your image trans squares. Then, taking the smaller cutter, chop out the middle of the two (or more if you want a thicker bead) blank squares. Make sure your image squares are dry and not going to smudge ( I put a coat of Klear floor polish on them ) put the first one face down on your work surface, stack the two blank squares with the centres chopped out on top and finish off with the second image square face up. Gently push together without squashing or distorting.

Make a hole about 3/4 of the way up what will be the vertical side of your bead when strung, on both sides in order to allow string/thong to be threaded through, poke a barbq skewer or suchlike mandrel through the holes to suspend the bead on whatever kind of rack you use when baking, then bake. . .
Being me I had to mess around with them after baking. I painted the sides with alcohol ink and then gently sanded the top and bottom where the ink had encroached onto those surfaces. As they had been varnished and fired the sanding didn't erode the images as long as I was careful, but did take away some of the ink, giving a nice, faux ancient effect.
I'm really pleased with how they turned out and am going to mess around some more with this technique, when I get some time. . .
cheers,
Jon x


Thursday 27 November 2014

Price Reduction. . .

Pricing being a bit of a black art where creative input is involved, I have decided that I was perhaps being unduly optimistic in the prices I was asking for my necklaces. After all, I am still at an early stage of my existence as a seller of such things and maybe my prices should reflect that. Debatable I know. People tell you that if you start off pricing things low you can never raise your prices. . . OK, but I'm not going to give stuff away, just lop a bit off now that I have a better idea of what is out there selling for what price etc.
There are also a couple of new ones I added today and some new barrel beads.
click HERE to Check 'em out. . .
Jon x


Wednesday 26 November 2014

Image transfer musings


I've spent a fair few hours wrestling with various forms of image transfer onto Polymer Clay over the past few months. I have various (hundreds. . . ) of cool images that I created digitally by various means, that I have wanted to get off the computer and onto any substrate that will take them. Getting them onto Polymer Clay seemed an interesting challenge.
My explorations so far have been aimed at trying to get images onto raw clay that I could then manipulate by wrapping them round things. Most of the brighter and crisper ways of transferring images all seemed to involve baking the clay, or blasting liquid clay with a heat gun. OK in their way but you are left with a stiff, flat thing that is unwrappable.
The only way I found to transfer onto raw clay was the one that Donna Kato mentions in her book on Creative Surface Effects. It involves using a laser print, (it doesn't work with inkjets) and water. Several people have Youtube vids of this technique too. Basically you place the image face down on a bit of clay, rub/burnish the back of it to make sure the image is in good contact with the clay surface, then, using water and your index finger, rub gently-ish until the paper rubs off. This leaves you with the image that was once on the paper, now imprinted on the surface of the clay. There are various subtleties to it but in a nutshell, that's what you do.
What I then tried was to wrap that image around a pre-made tube bead, either baked or unbaked. The problem I encountered was that the image stuck to my fingers and smudged badly. OK, I tried hardly touching the image when wrapping, but that was very hard to do as some pressure and guidance is needed to get the wrap at the right angle etc.
I tried this technique with trans clay. The image stuck to the clay better, and much less to my fingers, but the resultant image looked a bit faded and dull somehow.

Early experiments

So I thought a bit and decided to try a mix of trans and white clay, white for the image quality and trans for the relative handleability. I tried about 80% white to 20% trans. This was better and I got some reasonable results, with the caveat that I wasn't going for anything pristine, I liked the wonky, cheap transfer/ancient artifact/rustic vibe I was getting, I just didn't want smudged images.
On a whim I tried something out. .  I figured that what I needed was something in between the image and my fingers that would protect it from smudging when being handled, so I tried a thin coat of Klear floor polish brushed on. This worked OK up to a point. . .
The issue with the basic laser print/water technique is that when left, over time the ink gets stickier and the clay gets stiffer and likely to crack when being wrapped. Putting a thin layer of weak varnish on helps with the first problem, but not so much with the latter, you have to try to judge when the varnish is dry enough to handle but that it hasn't dried to the extent that it will crack when wrapped.
I have had some success with this but still have to handle it as little as I can as the act of wrapping seems to re awaken the stickiness somehow. It's also not consistent enough for me to draw firm conclusions about what I am doing. I feel it sort of works, most of the time ;-)
Any of you found better methods?
Jon x


Sunday 23 November 2014

Man Stuff

Somebody on a forum I hang around on said that my work had a 'masculine' vibe to it. I have no problem with that assertion, I don't have much interest in the prettier more delicate side of things.

(Not that I deem pretty and delicate to just be something that interests women, you understand. I draw a distinction between 'female' and 'feminine', just as I would between 'male' and 'masculine'. Pretty and delicate is generally classed as 'feminine' while the more rugged and chunky side of things is generally considered to be 'masculine'. I'll go with the generally accepted view for the sake of convenience if nothing else. All that 'sex vs gender' stuff gets complicated pretty quick so I will back off before I mess up too badly.)

So, my work has a masculine vibe.


An addendum to that remark was that I might consider making jewellery for men.

This wasn't something I had considered, having only recently started making jewellery at all, and not really thought deeply about who it might be for. . . So I had a scout around online to see what was what in the adornment for chaps department.

Well, there's a fair bit of it about. Quite a lot of chunks of grey metal on thick leather thong, sub David Beckham kind of stuff. Not very me. The other end of the scale seemed to be the hippy guy stuff, rough ethnic beads worn in festoons. Fun but a bit too hippy. There's a sort of 'Man of the Woods' style with it's fair share of chunky clay, wood, leather and twisted hessian. But it's all a bit hairy chested for me. ( I had a hair on my chest once, but it has long since departed. I cry about it sometimes. .)
There's also something that categorises itself as 'beach', which seems to be quite simple stones or beads on a simple thread/thong. Quite nice but my nearest beach is miles away, pretty crap as far as surf goes, and freezing cold most of the year, so I can't get inspired thinking of beaches really. (Although, there is a place called California just a bit further away. Trouble is, it's a basically a bleedin great caravan site as far as I remember and nothing even vaguely like the 'real' California. makes me smile to think of the comparison though. It's entirely likely that it was called California way before the other California. . . hah!)

I guess if I were to go down the road of making male jewellery I would want to situate myself somewhere in the middle of all the above. Kind of Surfing Hippy Man of the Woods with sub David Beckham tendencies. (Google that!)
So anyway, I made this.


Any views on it's gender pretensions? I actually wore it round the house to see how it felt and looked. I thought it was pretty cool. . . Your mileage may vary. . . ;-)
best,
Jon

Saturday 22 November 2014

Dangerous Dancing. .

Well, I felt me age yesterday. There I was, working away at my desk with my iTunes set to 'random', which is a nice way to get an eclectic mix of tunes, the majority of which you will like, when this came on.


Yeeeeeah. . !
It's from an album called 'Intensified' that I had back in the eighties. As I'd been sitting down for hours by then I stood up and stretched my legs. Then I thought I'd try that 'running on the spot in slow motion' type dance that was de rigeur amongst Ska fans in my youth. Like the guy out of Madness used to do. I mean you can't not move to that tune innit?

So I was just getting into me stride when Eeeeek! .  my left calf muscle gave a serious twinge. I curtailed all bopping activity with immediate effect and gingerly flexed my left foot. . . Ow!. . .
So now I can't put my weight on my toe on that side and I'm hobbling about the place. No serious damage thankfully, but it makes you realise A. - How suddenly something can happen that affects your life and how you live it. I can't drive for a day or two, or walk to the shops etc. B. - How often you actually use your calf muscle, going up and down stairs is interesting. . and C. - It makes you admire even more how disabled people cope on a daily basis. Respect!

Oh well, I'll survive, poor old boy. . . Fah!

Anyway, on a happier note I sold three big buttons and a set of small buttons on Etsy, hooray. I shall make some more. . .


best,
Old limping Jon

Wednesday 19 November 2014

Well, that was great ;-)

Now it's all dying down a bit from the somewhat feverish activity yesterday on my various social media type pages, due to the feature on Polymer Clay Daily, (Which I neglected to blog about. . . that was clever) I can draw breath.
I got just over a thousand views on my Etsy shop, a bunch of new followers on Flickr, a load of repins and followers on Pinterest and generally a lot of very nice feedback from all sorts of lovely people. Some of it from people who's work I have admired for ages, like Claire Maunsell and Luan Udell. I feel blessed ;-)
Didn't sell anything, mind ;-)

I put some of my new textured disk beads up on my Etsy shop to keep the momentum going there. Now that I have an audience, or at least a bunch of people who have voluntarily decided to be informed of my Polymer Clay and other artistic activity, I need to keep it coming and keep it interesting. Should be fun.
Jon x


Tuesday 18 November 2014

Hey! ;-)

I had a nice surprise this morning. Cynthia Tinapple featured my work on her most excellent blog, Polymer Clay Daily.

http://polymerclaydaily.com/2014/11/18/polymer-clayhem/

Getting feedback on their creative work can make such a difference to an artists confidence and general mood. Many artists work in a bit of a vacuum of their own making. I know I tend to.

It's all too easy to construct the notion that there's no point showing your work as nobody will be all that interested. Especially if what you do is quite obscure and you feel that it's only likely to appeal to a particular subset of people, who more than likely won't get to see it anyway. . . So you don't bother.
Not a helpful mindset. A nice combination of arrogant and lazy ;-)

So getting the opportunity to see if what I make strikes a chord with others is really valuable. And it shows that a bit of reaching out into the world of social media and creating more of a web presence can be rewarding. Not something I would have said six months ago. A lesson I needed to learn.
Colour me encouraged. . .

Thanks Cynthia ;-)

Jon x


Sunday 16 November 2014

Sold Something. . .

At a local art show. I entered a few of my framed, printed tiles in a 'Well why not?' sort of mood, and when I turned up today to pick up my work, was agreeably surprised to find that I had sold one of my special 3 -tiles-in-a-frame ones. One of my seemingly Art Nouveau derived ones.

Though the 'Art Nouveau' is actually no such thing. The shapes in my tile design that echo that famous art movement being a product of complex fractal mathematics, a finely honed skill set, experience and a creative mind that Follows the Fascination where it leads. . . I found the resemblance during my digital explorations, and pursued it ;-)

I'm glad somebody liked them enough to buy them. I like them, but I don't really count. It also shows that I finally may have the pricing about right. £75. I didn't have time to photograph them before I put them in the show but here is a quick Pshop mock-up. I shall make some more of that design. And I think I shall try a 3 tiler or two in my tiles and coasters Etsy shop.
Onwards and upwards. . . ;-)


Saturday 15 November 2014

An update

Just a quick update on my polymer clay activities for them as are interested in such things and are reading this blog. OK so that's nobody. Well, I'm interested so I shall inform myself of my own activity ;-)

I put Thursday aside as my official Polymer Clay day, as I work hard enough the rest of the week on other stuff, and as I am freelance and work from home, I can allocate my time as I choose. This is the upside of freelance life, and not one I would change for all the tea in China. (partly because I wouldn't have room for all that tea, I would need a VERY big shed, but mainly because I can't see anyone offering me that particular deal, but as they say, be careful what you wish for. .)
So, on Thursday I made a whole bunch of components for possible and probable future projects, such as constructing necklaces.

Here's a pic or two.


From the top, three of my 'unfortunate resemblance' beads, better known to me as 'turd beads'. I shall know better than to make organic looking textured beads out of brown clay and texture them in yet more browny coloured stuff in future. Next to them are some textured disk beads, Below them are some faux 'African' scratched tube beads and some cool round scratch beads.


then some primitive spacers and then some of my image transfer beads, which always turn out just that annoying bit more 'rustic' than I intended. Still, I like them.


I made a possible necklace from various components. This is the sort of thing I want to pursue. Possibly even doing some stuff for men, having had a look to see what is being done in that area on Etsy. Interesting. . .
thanks for reading,
Jon x

Sunday 9 November 2014

OK, so off we go. . .

Up the Road to Nowhere ;-) Ooh, I'm so negative.
So, I now have a Facebook 'page' -

https://www.facebook.com/pages/Jon-Burgess/711946535567206

like wot I am told I need to have.

Actually, I do understand why I need such a thing, but it goes against the Northern European Protestant 'don't get above yourself, what's so special about you?' cultural ethos that seems to be hard wired into my psyche, to embark on this self publicity journey. I feel like I'm being a pushy, mouthy git by even trying to draw attention to myself. But this is my problem rather than a problem with the process, after all, if nobody knows you exist, or what you are producing, then it does seem a bit pointless producing it. Innit?

So off we go, as I mentioned earlier. Let's see what happens.


Sunday 12 October 2014

Sold a couple of things. . ;-)

While I have been taking a short break to work out how best to use this blog, and other forms of social media, i.e. actually make it interesting. . . I have sold this and that. Six various bead sets on my JBDRusticOrganic shop and a set of glass coasters on my Jon Burgess shop. So October is getting a thumbs up from me so far.


Ok, back to the social media drawing board for a while. .

Monday 29 September 2014

What a difference a couple of cheap wire spacer beads make. . .


The thing is, my interest in Polymer Clay has led me into making beads and suchlike, as that is one of the main things it is used for. Logically, I should really try to make the beads into pieces of jewellery and adornment, rather than just hoping people will buy them and use them in their own constructions. 


To this end I got some cheap, but quite nice wire spacer beads and some leather thong to string them all on. It kind of legitimises the beads somehow and makes them look like they should be part of a necklace. I wasn't expecting that really. So, I shall experiment further with this necklace etc making thing. The image trans tube beads came out best.


Friday 26 September 2014

OH well

We're all still here. Internet meltdown failed to occur. Goody good. Normal service will be resumed.

Thursday 25 September 2014

Just checking to see where this post ends up. I'm making another attempt at mastery of FB and Twitter.
I can share this post on FB and Twitter, but I think my Twitter is linked to my FB, and possibly the other way round too, so if I post something here and share it on Twitter and FB, that might that trigger it to re-appear on FB and Twitter which will trigger it to re-appear on Twitter and FB and so on. . . .
It could very well be the trigger for the mother of all feedback loops, expanding exponentially, building up into a nightmarish swirling vortex, causing servers to spontaneously combust, thereby destroying the entire internet, and it'll all be my fault. Sorry about that but I have to know. . .

Wednesday 24 September 2014

More Texture sheet stuff

These are some discs I made to show off the textures I made with my photopolymer stampmaker kit. Not sure what to do with them as I am not any kind of jeweller. I see people making inspiring necklaces, pendants and other assemblages, but haven't yet put my toe in that particular water. It's the making and experimenting I like. It will be a bit of a learning curve. But if you don't try you don't learn, I need to give it a go. Any tips? ;-)


Saturday 20 September 2014

Textured Spikes


Here are some  long thin spikes with an added strip wrapped round, all textured fairly aggressively using my photopolymer texture sheets ;-)
They could be long dangles on a necklace ( about 4" 10cms long ) or as a couple of people have suggested, they could be stuck into a 'twisty bun' hairstyle. I would need to make them with a wire core for this use to be viable though. I like them and I'm going to make some more and try different surface treatments etc.

Thursday 11 September 2014

Textures and such

You probably know all this already, but bear with me.
To make raised textures on Polymer Clay artists use specially made sheets or stamps which they press into the clay. You can make your own by pressing textured things into flat pieces of raw clay, baking it and then using that baked clay as a texture stamp. People use leaves, tree bark, in fact just about anything with an interesting texture on it. I've had some fun making these myself.


The thing I really wanted to do was take the images I make on my computer and make them into texture sheets to use with Polymer Clay. It took a while and much googling for me to find out how it could be done.
It is achieved by using something called Photopolymer Gel, which is a kind of rubber/silicon which is sensitive to UV light. You shine the UV light through a negative image, and the black part goes hard and the clear part stays liquid (or possibly the other way round. . . ) and can be washed away leaving a rubber stamp. The negative image might be a print on acetate of your computer image. . .

So, this is what I did. Sparing you further explanations, here are a couple of examples of the images I used as negatives.


And here are a couple of examples of textured items made with the texture sheets derived from those images and other similar ones. . .